


The thin line of silicone around your shower, wash basin, bathtub, toilet, or floor joints might seem insignificant, but it is one of the hardest-working materials in your entire bathroom.
Every single day, it prevents water from slipping into gaps where it doesn’t belong.
Once this seal begins to crack, shrink, peel away, or develop mold, water quietly finds its way behind tiles, beneath sanitary fixtures, and into walls.
Unfortunately, this damage usually happens slowly. By the time damp patches appear on adjacent walls or ceilings, the problem has often existed for months.
This is exactly why bathroom silicone repair should never be treated as a cosmetic job. It is one of the most effective ways to protect your bathroom from expensive structural damage.
In Indian homes, bathrooms face particularly challenging conditions.
Daily showers, bucket baths, constant humidity, hard water deposits, poor ventilation, and long monsoon seasons all accelerate the ageing of silicone joints. Even premium sanitaryware cannot prevent water damage if the sealing around it has failed.
Many homeowners make another costly mistake—they simply apply a fresh layer of silicone over the old one. While this may look acceptable for a few weeks, it rarely solves the underlying issue. Water, soap residue, mold, and bacteria remain trapped beneath the old sealant, causing the new layer to lose adhesion much sooner than expected.
The good news is that most bathroom water leakage problems can be prevented without major renovation. Understanding how silicone works, when it fails, and how to repair it correctly can save thousands of rupees in future repair costs.
In this guide, we’ll explain everything you need to know—from choosing the right sealant to identifying early warning signs, understanding professional bathroom sealant services, and knowing when it’s time to call an expert.
Why Bathroom Silicone Is More Important Than Most People Think
Many people believe bathroom tiles themselves stop water from entering the walls.
They don’t.
Ceramic tiles, porcelain tiles, marble, granite, and vitrified tiles are all water-resistant surfaces, but the joints around fixtures remain vulnerable. Water naturally follows the smallest available path.
Think about all the places where different materials meet:
- Between the wall and floor
- Around the wash basin
- Around the toilet base
- Around shower enclosures
- Around bathtubs
- Between glass partitions and tiles
- Around floor drains
- Corners where two tiled walls meet
Every one of these joints expands and contracts slightly as temperatures change and buildings naturally move over time.
If these joints were filled with ordinary cement or grout, they would crack quickly.
Silicone, however, remains flexible. It stretches as surfaces move while continuing to block water.
This flexibility is exactly why silicone is preferred in wet areas.
But flexibility also means silicone has a limited lifespan.
Why Silicone Fails in Indian Bathrooms
One question professionals hear frequently is:
“The bathroom is only four years old. Why has the silicone already started peeling?”
There isn’t just one reason.
Usually, several factors work together.
1. Constant Water Exposure
Unlike kitchens or living rooms, bathrooms remain wet almost every day. Water repeatedly attacks the edges of silicone joints. Over time, adhesion weakens. Eventually, tiny gaps begin to appear. These gaps may be almost invisible, yet they allow enough water to start damaging the substrate underneath.
2. High Humidity
Many Indian bathrooms have limited ventilation. Without proper airflow, moisture stays trapped for hours after every shower. This creates ideal conditions for mold growth. Black spots that homeowners often assume are “dirty silicone” are actually colonies of mold feeding on accumulated soap residue and moisture. Once mold penetrates deeply into silicone, cleaning products usually cannot remove it permanently. In many cases, complete bathroom silicone repair becomes the only long-term solution.
3. Hard Water Deposits
In many Indian cities, hard water leaves behind mineral deposits. These deposits slowly build along silicone joints. Besides making the bathroom look dirty, mineral accumulation can reduce the bond between silicone and surrounding surfaces. Over time, the seal starts separating from the tile or sanitary fixture.
4. Poor Installation
This is perhaps the biggest cause of premature failure. Many installers:
- don’t clean the joint properly
- leave dust behind
- apply silicone onto wet surfaces
- skip masking tape
- fail to tool the bead correctly
- use the wrong joint depth
- select low-quality silicone
The bathroom may initially look perfect.
However, within one or two years, cracks begin appearing.
Professional installers understand that good sealing is far more about preparation than simply squeezing silicone from a cartridge.
5. Wrong Type of Silicone
Not every silicone available in the market is suitable for bathrooms. Some inexpensive products lose elasticity quickly. Others discolor rapidly. Some become breeding grounds for mold because they lack antifungal additives. Choosing the cheapest option often results in paying twice—once for installation and again for replacement.
The First Signs That Your Bathroom Needs Attention
One of the biggest advantages of spotting silicone failure early is avoiding costly waterproofing work later.
Watch for these warning signs:
- ✔ Black mold that keeps returning
- ✔ Silicone peeling from tiles
- ✔ Gaps around sanitary fittings
- ✔ Water leaking outside the shower area
- ✔ Damp patches on adjoining walls
- ✔ Paint bubbling outside the bathroom
- ✔ Musty smell despite regular cleaning
- ✔ Loose silicone near the floor
- ✔ Cracked corners
- ✔ Water marks on the ceiling below
If you notice two or more of these symptoms, don’t ignore them. Early bathroom silicone repair is almost always simpler and less expensive than repairing damaged plaster, repainting walls, replacing swollen cabinets, or addressing moisture trapped beneath tiles.
Choosing the Right Sealant and Knowing When to Repair or Replace
One of the biggest misconceptions homeowners have is that all silicone sealants are the same. Walk into any hardware store and you’ll find shelves filled with tubes claiming to be “waterproof,” “mildew resistant,” or “100% silicone.” The price difference can also be confusing—one tube may cost ₹180 while another costs ₹700 or more.
So, is the expensive one always better?
Not necessarily.
The best sealant for your bathroom depends on where it will be used, how much water it is exposed to, and the surface it’s bonding to.
For example, the seal around a wash basin experiences very different conditions compared to the joint where a glass shower enclosure meets the floor. Likewise, a bathtub joint expands and contracts much more than the joint around a toilet base.
Understanding these differences helps you choose a sealant that lasts longer and reduces the need for frequent bathroom silicone repair.
What Makes a Good Bathroom Silicone Sealant?
A quality bathroom silicone should do much more than simply fill a gap.
It should:
- Remain flexible for years
- Resist mold and mildew
- Adhere strongly to ceramic, porcelain, marble, granite, glass, and metal
- Handle daily exposure to water and cleaning chemicals
- Withstand temperature changes
- Stay intact despite slight building movement
If any of these qualities are missing, the seal may fail long before the rest of your bathroom does.
Acid Cure vs Neutral Cure Silicone: Which Is Better?
This is one of the most common questions people ask when planning a repair.
Acid Cure Silicone
Acid cure silicone is easily identified by its strong vinegar-like smell during application.
Advantages
- Cures quickly
- Bonds very well to glass and glazed ceramic
- Usually costs less
Limitations
- Can corrode certain metals
- Not ideal for natural stone like marble or granite
- Strong odor during installation
- Less suitable for some premium bathroom fittings
For simple ceramic tile installations, acid cure silicone can perform well if applied correctly.
Neutral Cure Silicone
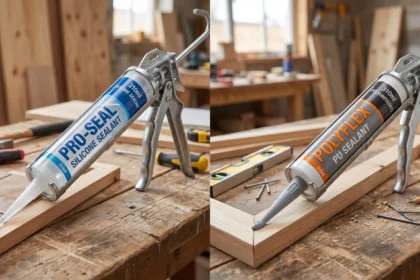
Neutral cure silicone has become the preferred choice for many professional installers, especially in premium bathrooms.
It offers:
- Excellent adhesion to a wider range of materials
- Low odor
- Better compatibility with metal fixtures
- Suitable for marble, granite, glass, aluminium, stainless steel, and composite materials
- Longer service life in demanding environments
Although it usually costs more, the additional durability often makes it a better investment.
For homeowners looking for a long-lasting bathroom silicone repair, neutral cure sanitary silicone is often the preferred option.
What Is Sanitary Silicone?
Many people assume “sanitary silicone” is simply a marketing term.
It isn’t.
Sanitary silicone contains additives that slow the growth of mold and mildew.
Bathrooms remain damp for long periods, making them an ideal environment for fungal growth. Ordinary silicone may begin developing black spots within a year, especially if ventilation is poor.
Sanitary silicone helps delay this process, keeping joints cleaner for longer.
However, it’s important to understand that no silicone is completely mold-proof forever. Even the best products need regular cleaning and proper ventilation to perform well over time.
Can Any Silicone Stop Bathroom Leaks?
No.
This is where many homeowners are disappointed.
Silicone can only seal accessible joints. It cannot fix:
- Broken plumbing pipes
- Waterproofing membrane failures
- Cracked drain traps
- Hollow tiles caused by poor installation
- Structural movement
- Large cracks inside walls
If water is leaking because of one of these issues, applying more silicone won’t solve the problem.
A proper inspection is essential before starting any bathroom silicone repair, otherwise you’re only treating the symptom rather than the cause.
Repair or Replace? How to Decide
Many homeowners ask whether they should simply repair a damaged section or remove everything and start again.
The answer depends on the condition of the existing seal.
Repair Is Usually Enough When:
- Only a small section has lifted
- The remaining silicone is still firmly bonded
- There is no mold underneath
- No water has been leaking behind the joint
- The silicone is still flexible
A localized repair can restore protection if the surrounding material is still in good condition.
Complete Replacement Is the Better Option When:
- The silicone has become brittle
- Multiple joints are peeling
- Mold keeps returning
- Water has already seeped behind tiles
- Different colours of old repairs are visible
- Silicone is separating from both surfaces
- The bathroom hasn’t been resealed for many years
In these situations, trying to patch individual areas often becomes more expensive in the long run.
This is why professionals frequently recommend removing the old seal completely before applying a fresh one.
Why Applying Silicone Over Old Silicone Doesn’t Work
This is probably the most common DIY mistake.
It seems logical:
“The old silicone has gaps, so I’ll just apply another layer.”
Unfortunately, fresh silicone does not bond reliably to aged, contaminated silicone.
The old layer usually contains:
- Soap residue
- Shampoo deposits
- Hard water minerals
- Cleaning chemicals
- Dust
- Mold spores
- Body oils
Even if the new bead looks neat, the underlying contamination weakens the bond.
Within weeks or months, the new layer often starts peeling away.
Professional bathroom sealant repair always begins by removing the existing silicone completely before cleaning and preparing the joint.
Common Bathroom Areas That Need Resealing
Silicone doesn’t fail everywhere at the same rate.
Some joints experience much greater stress than others.
The areas that most commonly require attention include:
Shower Enclosures
The joint where glass meets the floor or wall is constantly exposed to running water. Over time, this often leads homeowners to seek a shower caulking repair or even a complete replace shower caulking service.
Bathtubs
Bathtubs expand slightly when filled with water and occupied, placing extra stress on the surrounding seal. A professional bathtub caulking service ensures these movement joints remain watertight without restricting natural expansion.
Floor-to-Wall Corners
These corners collect water every day and are often overlooked during cleaning. Cracks here can allow moisture to travel beneath floor tiles and eventually affect adjacent rooms.
Wash Basins
Small gaps around basins can gradually allow water into vanity cabinets, causing swollen wood, peeling laminates, and unpleasant odours.
Toilet Bases
Although less frequently discussed, the seal around the toilet base also helps prevent water from reaching the floor beneath the fixture.
Tile Expansion Joints
When movement occurs between tiled surfaces, bathroom tile caulk repair becomes essential to maintain flexibility where rigid grout would otherwise crack.
The Most Common Causes of Bathroom Seepage
While every bathroom is different, professionals regularly encounter the same issues.
1. Failed Silicone Around Shower Areas
The shower is usually the wettest part of the bathroom.
Every shower sends water directly onto corners, glass joints, wall junctions, and floor edges.
If the silicone begins separating from either surface, water can slip behind it every single day.
Many homeowners only notice the issue when they eventually need a shower caulking service after discovering mold, loose silicone, or persistent dampness.
2. Cracked or Missing Grout
Grout fills the gaps between tiles, but it isn’t designed to replace silicone.
Unlike silicone, grout is rigid.
As buildings naturally move over time, grout may crack, creating small pathways for water.
Replacing cracked grout alone doesn’t always solve the problem if nearby movement joints also require sealing.
Professionals often inspect grout and silicone together because both systems work as a team.
3. Poor Drainage Slope
Sometimes the problem isn’t the sealant at all.
If the bathroom floor doesn’t slope correctly toward the drain, water remains standing for long periods.
This constantly exposes silicone joints to moisture, shortening their lifespan.
Over time, even good-quality sealants can deteriorate faster under these conditions.
4. Loose Sanitary Fixtures
Wash basins, toilets, and bathtubs should remain firmly fixed.
When these fixtures begin moving slightly during use, they place repeated stress on surrounding silicone.
Eventually, tiny gaps develop.
These gaps may seem harmless at first, but repeated exposure to water gradually enlarges them.
5. Poor Ventilation
Bathrooms without proper exhaust fans or windows remain damp for much longer after every shower.
High humidity encourages mold growth and prevents surfaces from drying properly.
Even premium silicone benefits from good airflow.
Simple habits like running an exhaust fan for 20–30 minutes after bathing or leaving the bathroom door slightly open can significantly extend the life of sealed joints.
DIY Repair or Professional Service?
Many homeowners successfully handle small maintenance jobs themselves.
Replacing a towel rail or tightening a tap is often straightforward.
Silicone repair, however, is less forgiving than it appears.
A professional installation involves much more than squeezing sealant from a cartridge.
The technician carefully:
- Removes every trace of old silicone.
- Cleans away soap residue and hard water deposits.
- Treats mold where necessary.
- Ensures the joint is completely dry.
- Chooses the correct sealant for the surface.
- Applies an even bead with consistent depth.
- Smooths the joint to eliminate air pockets.
- Allows adequate curing time before water exposure.
Even small shortcuts can reduce the lifespan of the repair.
For bathrooms with multiple failed joints or recurring seepage, experienced bathroom sealing services usually provide a more durable solution than repeated DIY attempts.
When Should You Call a Professional?
Not every cracked seal requires immediate expert attention.
However, professional help is worth considering if:
- Water stains have appeared outside the bathroom.
- Silicone is failing in several areas.
- Mold returns despite thorough cleaning.
- Tiles have started becoming loose.
- The bathroom has never been resealed for many years.
- Previous DIY repairs failed within a short time.
- You’re preparing a property for sale or rent and want a long-lasting finish.
Early intervention often costs far less than replacing damaged cabinets, repairing ceilings, repainting walls, or retiling an entire bathroom.